 A Sewing Adventure! Are you up for one?
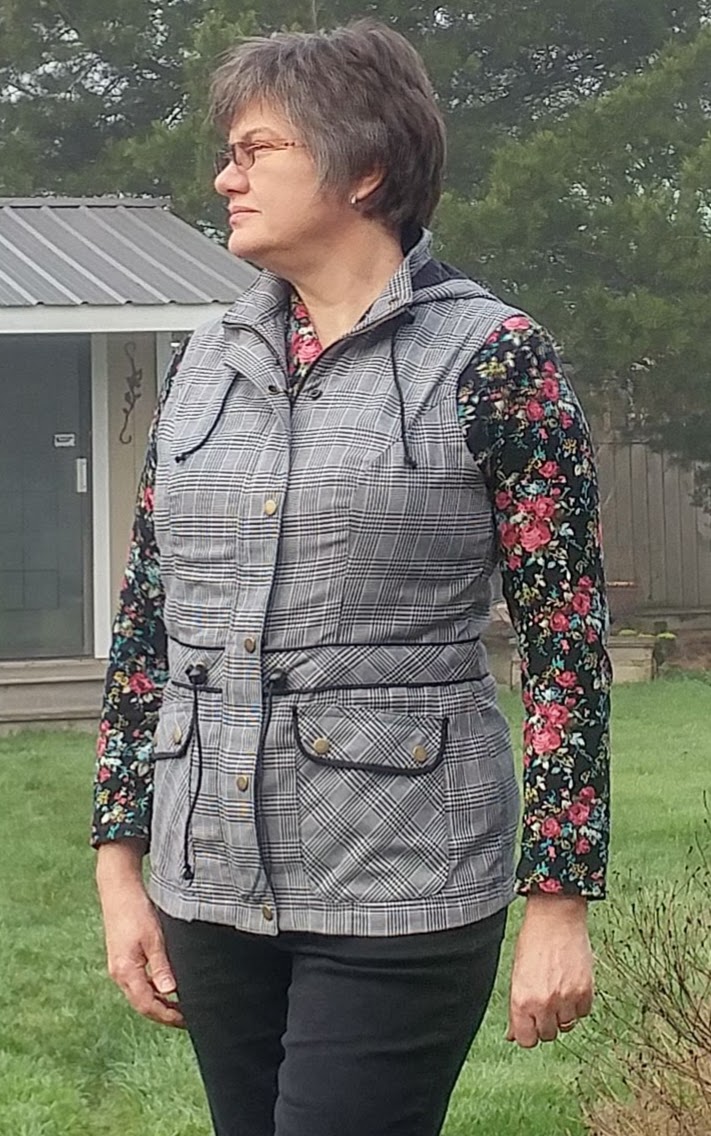
Using a plaid fabric to sew up the latest Itch to Stitch pattern, the Envigado Vest, turned it into a personal Creative Challenge! What an Adventure to discover the extent of my sewing skills!
Now, before I go any further, let me reassure you that when sewn in a solid fabric, or simple print, the Envigado Vest is a project well within the capabilities of the intermediate sewist.
Quite an interesting project as well, with princess seams, optional hong
kong seam finish, hardware, zipper, drawstring and more.
However, using plaid fabric like I did raises the skill level to advanced
It requires patience and calmness but mostly a joyous upbeat
approach...this is all about enjoying using the sewing skills one has
acquired for a fabulously satisfying experience!
This Plaid Fabric is a very lightweight wool blend. Lightweight fabric is a key to ease of sewing this pattern. Many layers to sew through in some places, like the front flap.
 |
| Back View |
With princess seams, the plaid cannot be matched on the entire seam because of the curve.
I chose to start matching from the bottom up until it became impossible to match any further.
The back shows the plaid matching best, as the front has pockets over alot of it.
 |
| Front Flap - the Plaid Matches!!! |
One of the most challenging parts for me was matching the plaid on the front flap piece to the body of the vest.
It required lots of reviewing of the construction and application method of the flap to get the placement of the plaid just right.
Even then, I did make a minor booboo. Interfaced the wrong piece...should have been the top piece but I did the bottom piece. Oh well, at least it stills functions that way.
 |
| Bias Cut Accents Add Interest |
Plaid prints cut on the bias add very interesting visual interest to a garment.
I chose to use bias cut plaid on the Drawstring Cover and Pockets.
Since bias cut fabric can be easily pulled out of shape during handling, I made sure to interface all bias cut pieces even if interfacing them was not called for in the pattern.
Great care was taken while interfacing these pieces to make sure they were not being distorted, by comparing the original pattern piece with the bias cut piece before the first touch of the iron to adhere the interfacing!
Thus interfaced, the bias pieces are a breeze to use.
The addition of flat piping to the Drawstring Cover gives a restful pause for the eyes between the regular and bias cut pieces, thus highlighting the different directions of the plaid.
Adding bias binding to the pocket flaps does this as well.
 |
| Making Hole and Inserting Snap |
 |
| Adding Back of Snap and Securing it |
Hardware such as Eyelets and no sew Snaps add such a professional touch to home sewn garments!
They are not difficult to install. Just do a practice run or two.
 I had such a good time sewing this Plaid Envigado Vest!
 Sewing is not just about the finished product... It is also about enjoying the journey!
Sometimes that means Challenging Yourself with a Sewing Adventure!
Sew....what about Your next Sewing Adventure....Will it be an Envigado Vest too?
No comments:
Post a Comment